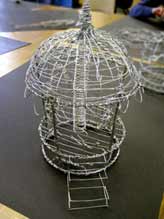
The all-girls art class in Renaissance, a French-speaking high school in Aurora, found this workshop an exciting challenge and went on to create a remarkable collection of objects. This merry-go-round took hours to make. Only a fraction of that time was in class! École secondaire Renaissance Aurora, Ontario
PHOTO: PAUL WALTY © SPRING 2007
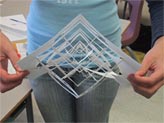
Far from the clay, wood, and stone, you usually associate with sculpture, wire may have less heft but its sinuous strength will lead you to some startling discoveries and a new understanding of working in the material world.
Too easy? Why not 3D a drawing. In twisting, bending, folding, crimping, weaving, kinking, knotting and looping the wire, you can turn out a full figure, a portrait, a bust or a caricature, all in the round.
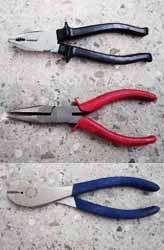
Tools
Top : These Lineman's Pliers include wire cutters;
Middle : These Needle-Nose Pliers also have wire cutters;
Bottom : Wire Cutters.
PHOTO: PAUL WALTY © SPRING 2009
Materials
Light gauge wire and coat hangers.
Light gauge wire, what's that? Gauge refers to the diameter of the wire. Keep youe eyes open for wire that is not as thick as that of a coat hanger. Look for 14 gauge.
Note: Make certain you are NOT purchasing:
- wire solder (Check lable and/or packaging)
- picture wire (multiple strands of wire lightly twisted together).
Coat hangers are ideal and can be used on their own or combined with wire to give workshop participants the chance to work with similar materials with different properties.
Useful Documents
A Checklist of Materials & Tools will help you keep track of what you will need for this workshop.
A series of exercises guide participants in their exploration of this ubiquitous material, and prepare them for applying what they have learned to the design of simple, practical, functional objects. The key is to find a solution with visual appeal.
Tools : Pliers and wire cutters. The former often include wire cutters. Obviously, if the budget is tight, pliers with the wire-cutter-feature would be the best buy.
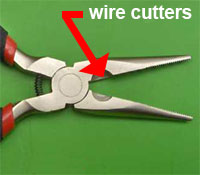
The Longnose Pliers pictured above include wire cutters
PHOTO: PAUL WALTY © FALL 2009
Materials : As with Wire Sculpture, light gauge wire and coat hangers are what you will be working with.
Look for 14 gauge wire. Make certain you are NOT purchasing wire solder nor picture hanging wire. Read the lables, or, if you are still in doubt, ask a clerk.
Coat hangers are ideal and can be used on their own or combined with wire to give workshop participants the chance to work with similar materials and explore their different properties.
Useful Documents
A Checklist of Materials & Tools will help you keep track of what you will need for this workshop.
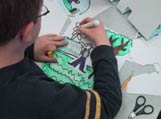
Photos of pupils' wirework.
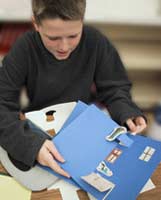
Testing a door that opens when one pulls on a carefully positioned tab. All gluing and cutting has to be done with care! Patience pays off!
PHOTO: PAUL WALTY © SPRING 2003
Pop-ups are a rich source of inspiration. They can add that little something to literacy programs or help you and your class sum up your curriculum explorations.
A simple set of techniques allow participants to create dynamic, eye-catching kinetic, stand-alone paper sculptures or apply the technology to books, cards and a variety of other support structures.
Materials: You will need white cardstock, scissors, gluesticks, markers, pencils and erasers.
The creation of special, small-run or one-of-a-kind publications. The size of the book and materials to be used in its construction will be determined by the nature of the publication.
This workshop can be geared to celebrating the prose or poetry of a literacy project, to exploring the interplay between image and word, or to presenting the artwork of the class.
Materials : Most papers currently stocked in your school can be adapted to this workshop. Cardstock makes a solid cover or even an entire book as long as the number of pages in the publication is modest (example: 1 - 6 sheets cover included).
Tools : pencils, erasers, markers, staplers, scissors, gluesticks.
Is working in three dimensions not your cup of tea, or even a little intimidating? Then, this workshop can put your worries to rest.
With a few straightforward, warm-up activities, you will discover that a pair of scissors, a slice of paper and a dab of patience will have you in the thick of things.
Paul shows-and-tells all in a series of easy-to-follow demonstrations that provide you with the confidence to create and problem-solve without working up a sweat. And if you should want that workout, he will offer you the encouragement you need!
Materials : Cardstock.
Tools : pencils, erasers, markers, rulers, staplers, scissors.
Craft knives are very useful. Should they be available, cutting boards are absolutely essential
Note: Coloured markers, crayons, coloured pencils or pastels, while not essential, can brighten up things.
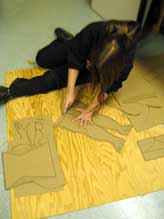
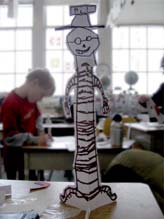
You have to cut just outside the heavy marker lines if you want this 3D cardboard figure to stand out. École secondaire catholique Renaissance, Aurora.
PHOTO: PAUL WALTY © FALL 2006
Why throw cardboard into the dumpster? Yes you will scratch your head over that one when you see what you can create in this workshop!
Participants select their building blocks from the simplest of geometric drawn-and-cut from cardboard. An exploration of the ways in which these shapes can be inter-connected provides a modular building technology that is surprising in its richness.
Materials : Cardboard, cardstock (a heavy-gauge paper available in packages of 250 sheets.
If craft knives are not available, Paul recommends using cardstock not cardboard. Cardstock is also strongly recommended for younger participants who may not have the strength to manipulate cardboard.
Cardboard should be 1-ply. Look for the kind of cardboard box in which manufacturers ship their packages of toilet paper, their disposable tissues boxes or their boxes of breakfast cereal.
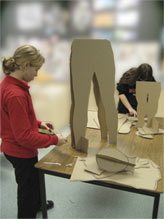
The assembly offers it's own set of challenges.
École secondaire catholique Renaissance,
Aurora, Ontario
PHOTO: PAUL WALTY © FALL 2006
Box Reminders!
Forget about this kind of cardboard:
a) boxes for fruit and vegetables
b) boxes for computer / office equipment
Why? They tend to be much to heavy.
Scissors
If your scissors only cut paper then try them out on bristol board or cardstock. Paul recommends you do this especially when working with younger participants.
Tools : pencils, erasers, markers, rulers, staplers, scissors.
Craft knives are very useful. If knives are available, cutting boards are absolutely essential
Note : Paint, coloured markers, crayons, coloured pencils or pastels, while not essential, can brighten up things.
Paint (tempera, gouaches, poster paint, etc.) is highly recommended for decorating.
Need a Medievalcastle? Want to build a hunter-and-gather village? What about constructing the world of the ancient Egyptians or the Maya. How about imagining the city of the future or just putting together the average Canadian city? A series of simple building techniques will transform drawings into eloquent 3D explorations of the places our ancestors lived in and those we live in today. This workshop is a fascinating visual exploration of the environments humans build in order to live together
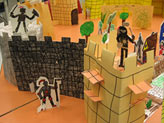
Cardstock was the main raw material in building this castle. Everyone had a structural component to contribute.
Dewson Jr. P.S., Toronto, Ontario.
PHOTO: PAUL WALTY © FALL 2006
Roll up your sleeves, grab some scissors or a craft knife and charge up your imagination. A few tips from the master builder will get you started. In short order you will be well on the way to erecting your own wonder of the world.
Materials : same as a Cardboard Sculpture 1.
Lets draw a dinosaur, a grizzly bear, a penguin! Then create in their habitat! What about populating the Boreal Forest with the creatures native to that environment? Where do these animals live? What do they eat? Where do they sleep? Questions we can answer by looking through books in the library or searching the web. With words and picture references we can draw, colour and cut out all we need to construct a 3D world for the artic fox, the beluga whale or the honey bee.
You might want to have lots of reference on hand if you decide to focus on animals. If books are hard to come by, try and get your class to do some research on the web. Don't forget to print out the best pictures.
Devins Drive Public School
PHOTO: PAUL WALTY © 2005
Animals and the places they live are the focus for our creative energy in this workshop. The tools and techniques are simple, direct, and are only limited by your imagination
Inspired by the bas-reliefs of Ancient Egypt, participants cut-out and layer cardboard, boxboard, bristol or poster board to create wall-mountable or free-standing dioramas.
This workshop can be adapted to other themes on request.
Materials: same as Cardboard Sculpture 1.
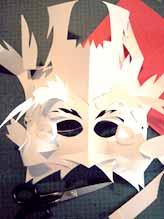
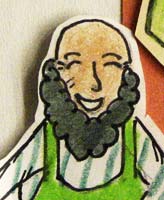
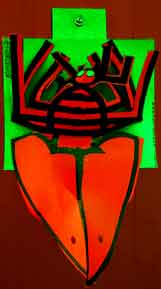
The character of this mask is determined by a lot of on-the-fly bending, folding and twisting of the cardstock (you might liken this material to a very light cardboard or a heavy paper).
The mask was a key part of a Halloween costume.
PHOTO: PAUL WALTY © 2009
By cutting, slitting, scoring, folding, twisting, pleating, braiding cardstock or bristol board we concoct wonderous variations on the human face. Imagine, it is even possible to create a mask without once removing a single piece from the original sheet of paper!
We learn to use those features of the face essential to our efforts to communicate with the world. That, in combination with an adventuresome manipulation of the paper, results in some captivating, provocative designs.
Materials: cardstock, bristol / poster board or even light cardboard (the cardboard of cereal boxes).
Tools: pencils, erasers, staplers and scissors.
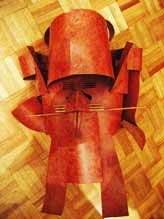
This mask is composed of recycled cardstock, dowells and a handful of brass fasteners.
Staples hold everything in place.
PHOTO: PAUL WALTY © 2009
This workshop differs from the previous in that it explores other media (to be determined in consultation with the artist.
Materials: The choice of materials depends on availability and intention. Examples: you might want to base an art activity on recyclables to highlight environmental concerns, or your school has a windfall of cardboard boxes that you would like to put to good use.
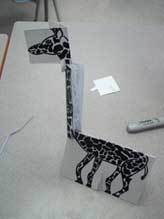
A marker drawing grows a third dimension with a little folding and bending.
Allenby P.S. Gr. 2/3
PHOTO: PAUL WALTY © Spring 2007
Drawing plays with the illusion of three dimensions. In this workshop, participants actually add the third dimension to their drawings by separating the various, easily identifiable parts of the drawing and then re-connecting them in the round .
Materials : cardstockbristol / poster board or even light cardboard (the sort cardboard cereal boxes are made) One school had a stock of old calendars printed on large sheets of cardstock. We used the reverse, unprinted side. The play between the printed and non-printed sides made for some interesting viusal effects
Tools : pencils, erasers, markers, rulers, staplers and scissors.
Like the haiku, single-panel cartoons can be a dazzling condensation of word and image that speak volumes. A free-flowing showcasing of the techniques and strategies of putting ideas to paper will introduce participants to the pleasure and excitement of this hallowed form of communcation.
Materials : letter-sized (8.5X11 inch) white paper.
Tools : pencils, erasers, black markers of varying thickness, rulers, scissors, a roll of masking tape, and some newspaper (to protect tabletops and desks from marker grafitti). You may select brush and ink.
An excerpt from a high school student's adventure in comic creation
École secondaire catholique Renaissance
Aurora, Ontario
Photo : Paul Walty © 2007
Comics are a medium of extraordinary versatility when it comes to creative expression. They provide an unparalleled opportunity to explore the ways of combining words and images to create vibrant, one-page stories or even book-length novels.
With paper, markers, ink, brushes, pencils, rulers and erasers, the sketching, drawing, the layout, inking and compositional techniques of this artform are introduced. Depending on the duration of the workshop, participants will have the chance to bring to life their own scenarios.
Small-run publication-production is possible. Yes, magazines in a variety of formats featuring student work can be made in-house.
Materials : white paper.
Tools : pencils, erasers, black markers of varying thickness, rulers, scissors, a roll of masking tape, and some newspaper (to protect tabletops and desks from marker grafitti). You may select brush and ink.
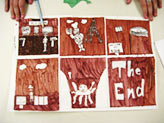
A limited selection of colours and drawings composed of simple shapes make this storyboard easy to read.
James Culnan
Catholic Elementary School,
Toronto, Ontario
Photo : Paul Walty © 2007
Movies, most multimedia projects, video games, plays, etc. are complicated projects that require a great deal of planning. A storyboard is a very important organising tool. It makes ideas concrete by putting them into words and pictures.
The storyboard layouts what is important. Its images can describes points of view, focus in on important elements or document sequences of events.
This workshop covers the techniques of storyboard creation. Superb drawing skills are not a pre-requisite!
Moving pictures appear amazingly complicated but are actually based on a few, simple techniques. This workshop is an introduction to flip-book animation - the analogue kind, which means the animation that relies on pencils-and-paper not computers.
In very graphic terms flip-books demonstrate the power of the drawing that moves. The smallest changes can produce stunning results.
Learn the ropes! Fast-paced activities soon get everyone up to speed. From two- to multiple cell animation, the participant soon learns the intricacies of rolling an object across a floor or making a bird fly.
This workshop is an excellent precursor to computer animation as it illustrates very clearly how the computer comes to the aid of the animator.
Materials : notepads.
Tools: pencils, erasers, black markers of varying thickness, and staplers.
An introduction to how drawings move using digital technology. The how's, where's and why's of animation basics are explored and used to build simple sequences. Participants work in groups to create a script, a storyboard, the set and all the actors.
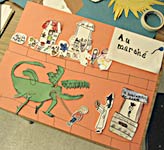
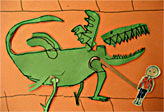
A grade 2 film crew decided that a dragon should replace the cow in their version of
"Jack and the beanstock".
Dewson Jr. Public School
Toronto, Ontario
Photo : Paul Walty © 2007
This year there are 2 workshops offered:
- a 5-day workshop
- a 3-day workshop
The 5-day workshop
This project runs over five consecutive days and may be subsidized by the Ontario Arts Council. The Council will also contribute to the travel and lodging costs of the artist. Funding in this case is determined by the date of application and what monies remain at that time. The earlier arrangements are made the better!
The 3-day workshop
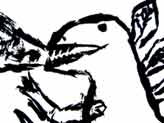
This character will show up clearly in the animated film because he has been drawn with crisp, bold lines. Just as importantly the artist left a generous margin thereby preserving the integrity of the lines.
James Culnan Catholic
Elementary School,
Toronto, Ontario
Photo : Paul Walty © 2007
This workshop can not be conducted over three consecutive days
Day 1 is the introduction to the project
Day 2 is devoted solely to filming
Day 3 is set aside for editing and preparation for film-distribution
Between Day 1 and Day 2 the participants prepare everything for filming. It is highly recommended that there be an interval of a week or two between visits of the artist.
Materials : cardstock or coverstock, construction, manila, and/or cartridge papers.
Tools: pencils, erasers, black markers of varying thickness, rulers, scissors, a roll of masking tape.
To add a little colour, coloured pencils, coloured markers, pastels, etc. are yours to explore.
A rule of thumb in my workshops is: add colour when you have done all you can and want to do in black-and-white work.
My personal work is largely monochromatic. For me, colour is a decorative element to added after all the "important things" are done.
In my workshops emphasis is placed on completing the black and white drawing. If the pupil is ahead of the curve, and waiting for the others to finish, then that is a good time to add colour.
Remember, this is not an ironclad rule that applies to all art and every artist. I am sharing with the class, my personal approach to art making.
Computers
Unless otherwise negotiated, the artist will supply all computer hard- and software, the digital camera, and the tripod.
This is a workshop that builds on a variety of "off-the-wall" activities to explore paint and its potential for image-making, over and above those defined by traditional representationalism.
We begin with some simple problem-solving which can be described as follows:
We engage ourselves in a wide-ranging exploration of how colours can be applied to a paintable surface and how they interact with each other.
Paint: water-based
Paintable surface: Construction, manila, cartridge and kraft papers are just fine. What about newsprint? It will do but does tend to be a little flimsy. Card and boxboard are alright, should you want to rely on recyclables.
Brushes Yes. But we will be experimenting with any number of ways to move paint from its container to the image. Sponges, erasers, plastic cutlery (serrated knives are great!), nails, string, etc. You get the picture I am sure
Maybe your schools wants a large painting on a wall at the main entrance. Maybe a big picture on a classroom wall would help the class focus on that certain something important in the curriculum. Or perhaps you require a backdrop for a school play.
Permanent or temporary, there are many approaches that will do the trick.
Materials: There are many possibilities. Whether it means recycling household latex, digging into the school's supplies of tempera paint, stocking up on cardboard from the local grocery store, etc. the choices each open different doors of opportunity.
Paul can help plan and guide all participants in the creation of the imagery.
Not all of your class are artists? You may be surprised at what they can do.
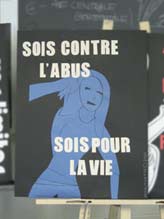
Hand-drawn and -cut lettering coupled with a limted colour palette give this poster punch. Size: 18x24 inches.
PHOTO: PAUL WALTY © SPRING 2007
It is not always easy to get your message across. This workshop introduces the basics of effective graphic communication. From the choice of words to writing copy, from colour-selection to making your own palette, from picking a picture to making your own, participants design and create their own poster.
Formats: standard letter-size to full-blown tabloid-sized creations.
Materials. Anything from kraft paper with tempera paints to markers and paper collage. The choice depends on availability, needs and cost.
Using old pasteup methods or modern digital compostion with Adobe InDesign or QuarkExpress, students tackle the challenge of designing their own paper, shooting photos and preparing a host of graphics for print, writing and editing their own articles, etc. In short all the steps needed to get their newspaper on the newstands.
Formats: standard letter-size to full-blown tabloid-sized creations.
Materials. The choice of paper depends on availability, needs and cost.
With software standards like Photoshop and Illustrator, students will explore the richness of computer imaging and learn how to prepare artwork for the web, the screen or hardcopy.

Dessin au crayon et à l'encre de chine passé à l'ordinateur; tirage sur papier cartoné au format feuille de lettre.
Formats: the workshop touches on the variety of image formats available, their strengths and weakness .
Materials: In situations where hardcopies are required, image quality will be determined by the cost and availability of appropriate papers.
Students will learn how to employ text, images, textures, colours and animations to best communicate their ideas and build effective presentations.
Software: Please note that workshops can focus on software packages other than PowerPoint (examples: Microsoft Word, Photoshop, etc.).
Materials: You may wish to consider storing student work on CD's or DVD's.
Students will learn how to design and build simple multimedia presentations.
Software: A variety of software packages can be used (examples: Microsoft PowerPoint, Macromedia DreamWeaver, Flash, Director, Photoshop, Acrobat, etc.).
Materials: You may wish to consider storing student work on CD's or DVD's.
The Paper Sculpture Workshop:
Insect made by the artist courtesy of Zuzana Hahn.
PHOTO: PAUL WALTY © SPRING 2004
Bold lines and a limited palette are not difficult to encourage when the results are so promising. A workshop at Dewson Public School in Toronto.
PHOTO: PAUL WALTY © 2005
This dragon spits balls of fire and has one mean wiggle as he saunters across the screen.
Another workshop at Dewson Junior Public School in Toronto.
PHOTO: PAUL WALTY © 2007